STO Keybind Wiki
STO Keybind Application creates complex keybinds for STO Game.
Brought to you by:
jeffvan
This section contains details on how the Star Trek Online keybind system works.
Index
The Queue and keybind sets
Space
Ground
Keybind Application
Advantages of the Queue and Activation time feature
Keybind System
The Chat Window Format
Text File Format
Possible Keys
Key Modifiers and Combination of keys
Variables
Common Commands
Chat Window Keybind Examples
Text File Key Bind Exaples
Simplifying Key Binds by adding some complexity first
Using the Text File to Import Key Binds
Execution Order
Dangers of Button Smashing
Text File Example
Other Resources
The QUEUE and keybind sets
The first part to understand about the Star Trek Online engine is the ability activation queue. For some areas there might be multiple queues. The queues have two slots in them. The first slot is the ability that is currently being activated and the second slot is the next ability that will be activated. When a new ability is pressed on the tray it is placed into the second slot, if the primary slot is filled. If there is an existing ability in the second slot, it will be replaced by the new ability. More information is provided on this below.
Space has a different keybind set than ground. If you want to create a keybind for space, you actually have to be in space to create the keybind. The same goes for ground. For space keybinds you can be in hyper space or local space and the keybinds will be the same. For ground you can be on your ship's bridge or anywhere where you can see your character move. There is more information on ground keybind sets below.
Space
In space, weapons have a separate queue from the abilities queue. This allows you to have your weapons on autofire without it disrupting your activation queue. Most abilities in space have a 0.5 second activation time. Some are only 0.25 seconds. This generally creates a two ability per second pace.
This separate queue for weapons and abilities causes an actual problem. Having a keybind with multiple abilities and weapons will cause the weapons not to trigger. Something related to the queuing of the ability removes the weapons from being queued. To create a keybind that fires only a specific set of weapons, will require you to place the weapons on their own key. You will therefore need to be pressing two keys, one for your abilities and one for your weapons.
Ground
On ground, all abilities including weapon abilities, use a single queue. Because of this feature, you should take care in creating keybinds since abilities can displace weapon fire as you are attempting to shoot. Most abilities are 0.5 activation time BUT some significant abilities have a much larger activation time. Some even last 4 seconds. Because of the larger activation time and the single queue, most players experience a latency effect, which is NOT server lag but a design feature.
On the ground there are two sets of keybinds. If you are in RPG mode you have a different set of keybinds than the set you have in Shooter mode. So make sure you are in the mode for which you want to create the keybind.
Keybind Application (MAKE IT EASY ON YOURSELF)
The keybind application was developed to make it a lot easier to develop complex keybinds. The first version of this application was developed to help a fleet mate with little understanding of computer operations. Since then the keybind application has evolved to be even more powerful. It has the ability to help you create keybind sets that you can actively switch during game play. The following videos will demonstrate the usage of the application:
Basic Operations
Web Open (Now Called INFO)
Predefined Keys
Create Keys that Cycle
Keybind Sets
How to use Preset
Download it here!
Advantages of the Queue and Activation time feature
The activation time and queue system allows players far away from the server location to have an equal footing with players closer to the server. With a latency of 200 milliseconds and an activation time of 500 milliseconds the ability would be visible to the opponent before it is active; and would still allow 300 milliseconds for the response. This might seem like a small time gap, but with good game knowledge the game becomes a fast version of speed chest.
In addition to the feature that allows people with a higher latency to play alongside players with a lower latency, there is also the feature of averaging 2 abilities per second. This creates a pace to the game and sets up a trend to a players attack in advance. With an average limit of two abilities a second the game doesn't get too overwhelmed with abilities. This is especially true on the ground, but overall in the game, this is a feature that is disappearing due to the lack of activation times on new abilities.
Key binds can either be entered through the chat window or through a text file that you can use to import the key binds. For short key binds the chat window works well but for long key binds the text file will be a need.
The Chat Window Format
Command Structure: /bind <key>
Command Part: /bind the bind command .
Command Part: <key> the key you want to assign the key bind to.
Command Part:
The command section can contain several commands separated by a delimiter. The delimiter is a double dollar sign ($$). For several commands encapsulate the series of commands with double quotations.
IMPORTANT: It is important to disable the Profanity filter while using the Chat Window Bind commands. The Profanity filter will remove sequences of characters that involve the $$ sign. This change will cause the bind command to create an incorrect bind.
Text File Format
Command Structure: <key> "
Command Part: <key> the key you want to assign the key bind to.
Command Part:
The same delimiter that is used in the Chat Window is also used in the Text File Format. Separate commands with a double dollar signs ($$). All commands need to be encapsulated with double quotation marks. Each key bind is placed on its own line. It will be helpful to use a text editor such as notepad to create the key binds.
Possible Keys
You would use the Key Name in your bind command or in the text file.
| Key Name | Description |
|---|---|
| [ | [ |
| \ | \ |
| ] | ] |
| Add | Add (+) |
| ALT | Alt |
| LALT | Alt (Left) |
| RALT | Alt (Right) |
| Down | Arrow Key: Down |
| Left | Arrow Key: Left |
| Right | Arrow Key: Right |
| Up | Arrow Key: Up |
| , | Comma (,) |
| Control | Control |
| LCTRL | Control (Left) |
| RCTRL | Control (Right) |
| delete | Delete |
| / | Divide (/) |
| End | End |
| F1 | Function Key 1 |
| F10 | Function Key 10 |
| F11 | Function Key 11 |
| F12 | Function Key 12 |
| F13 | Function Key 13 |
| F14 | Function Key 14 |
| F15 | Function Key 15 |
| F16 | Function Key 16 |
| F17 | Function Key 17 |
| F18 | Function Key 18 |
| F19 | Function Key 19 |
| F2 | Function Key 2 |
| F20 | Function Key 20 |
| F21 | Function Key 21 |
| F22 | Function Key 22 |
| F23 | Function Key 23 |
| F24 | Function Key 24 |
| F3 | Function Key 3 |
| F4 | Function Key 4 |
| F5 | Function Key 5 |
| F6 | Function Key 6 |
| F7 | Function Key 7 |
| F8 | Function Key 8 |
| F9 | Function Key 9 |
| Home | Home |
| insert | Insert |
| A | Key A |
| B | Key B |
| C | Key C |
| D | Key D |
| E | Key E |
| F | Key F |
| G | Key G |
| H | Key H |
| I | Key I |
| J | Key J |
| K | Key K |
| L | Key L |
| M | Key M |
| N | Key N |
| O | Key O |
| P | Key P |
| Q | Key Q |
| R | Key R |
| S | Key S |
| T | Key T |
| U | Key U |
| V | Key V |
| W | Key W |
| X | Key X |
| Y | Key Y |
| Z | Key Z |
| enter | Main Enter Key |
| Button1 | Mouse Button 1 |
| Button10 | Mouse Button 10 |
| Button2 | Mouse Button 2 |
| Button3 | Mouse Button 3 |
| Button4 | Mouse Button 4 |
| Button5 | Mouse Button 5 |
| Button6 | Mouse Button 6 |
| Button7 | Mouse Button 7 |
| Button8 | Mouse Button 8 |
| Button9 | Mouse Button 9 |
| Lbutton | Mouse Left Press |
| Middleclick | Mouse Middle Click |
| Rbutton | Mouse Right Press |
| Wheelminus | Mouse Scroll Down |
| Wheelplus | Mouse Scroll Up |
| Multiply | Multiply (*) |
| 0 | Number 0 |
| 1 | Number 1 |
| 2 | Number 2 |
| 3 | Number 3 |
| 4 | Number 4 |
| 5 | Number 5 |
| 6 | Number 6 |
| 7 | Number 7 |
| 8 | Number 8 |
| 9 | Number 9 |
| numpad0 | Numerical Keypad 0 |
| numpad1 | Numerical Keypad 1 |
| numpad2 | Numerical Keypad 2 |
| numpad3 | Numerical Keypad 3 |
| numpad4 | Numerical Keypad 4 |
| numpad5 | Numerical Keypad 5 |
| numpad6 | Numerical Keypad 6 |
| numpad7 | Numerical Keypad 7 |
| numpad8 | Numerical Keypad 8 |
| numpad9 | Numerical Keypad 9 |
| Decimal | Numerical Keypad Decimal |
| Divide | Numerical Keypad Divide |
| numpadenter | Numerical Keypad Enter |
| PageDown | Page Down |
| PageUp | Page Up |
| . | Period (.) |
| Shift | Shift |
| Space | Spacebar |
| Subtract | Subtract (-) |
| Tab | Tab |
| ` | Tilda Key (~) |
| Joy9 | XBOX Contr [A Button] |
| Joy10 | XBOX Contr [B Button] |
| Joy2 | XBOX Contr [Back] |
| Joy3 | XBOX Contr [L Thumb depress] |
| Joy5 | XBOX Contr [Left Bumper] |
| Lstick_down | XBOX Contr [Left Stick down] |
| Lstick_left | XBOX Contr [Left Stick left] |
| Lstick_right | XBOX Contr [Left Stick right] |
| Lstick_up | XBOX Contr [Left Stick up] |
| Joy7 | XBOX Contr [Left Trigger] |
| Joypad_down | XBOX Contr [Pad down] |
| Joypad_left | XBOX Contr [Pad left] |
| Joypad_right | XBOX Contr [Pad right] |
| Joypad_up | XBOX Contr [Pad up] |
| Joy4 | XBOX Contr [R Thumb depress] |
| Joy6 | XBOX Contr [Right Bumper] |
| Rstick_down | XBOX Contr [Right Stick down] |
| Rstick_left | XBOX Contr [Right Stick left] |
| Rstick_right | XBOX Contr [Right Stick right] |
| Rstick_up | XBOX Contr [Right Stick up] |
| Joy8 | XBOX Contr [Right Trigger] |
| Joy1 | XBOX Contr [Start] |
| Joy11 | XBOX Contr [X Button] |
| Joy12 | XBOX Contr [Y Button] |
Key Modifiers and Combination of keys
You can create key combinations by using the + key to add combinations. To create a key combination that uses the left arrow key and the up arrow key you would use "Left+Up". You can do this for the Control key by adding Control+1 to create a combination key for Control 1. You can go even further and add multiple keys such as Control+1+2 which would require pressing the control key and the 1 and 2 key simultaneously.
Control+ Adding the Control+ in front of the key will setup a key combination of Control+<key>.
Alt+ Add the Alt+ in front of the key will setup a key combination of Alt+<key>
+ You can combine several keys by adding the + key between keys.
Example: /bind Control+F "team Hallo everyone."</key></key>
Variables
$Target The $Target contains the name your target. If this is included in text or in the space of a Name it will be replaced with the Name of your Target. For example: /bind c "team Target [$Target]". If our target's name is "Steve Alen" then this command will enter into team chat "Target [Steve Alen]".
Common Commands
| Command | Description |
|---|---|
| ++AutoForward | Ground: Walk forward (Automatically) |
| +Aim | Ground: Enter Aim mode |
| +backward | Ground: move backward |
| +Crouch | Ground: Enter Crouch |
| +down | Ship nose down |
| +Forward | Ground: move forward |
| +left | Ship nose left |
| +Left | Ground: Strafe left |
| +Power_Exec Distribute_Shields | Distribute shields |
| +right | Ship nose right |
| +Right | Ground: Strafe right |
| +Roll | Ground: Roll |
| +Run | Ground: Sprint |
| +TrayExecByTray <x> <y></y></x> | Execute slot Y on tray X (Using real number system) |
| +TurnLeft | Ground: Turn left |
| +TurnRight | Ground: Turn right |
| +up Ship | nose up |
| +Up | Ground: Jump |
| +Walk | Ground: Walk |
| Assist <x></x> | Target the target of the person X. |
| defaultautoattack <x></x> | Turn weapon autofire off and on. X = 1 turns it on and X = 0 turns it off. |
| bind_load_file <x></x> | Load a bind file into the client. The X value is the name of the bind file to load. |
| bind_save_file <x></x> | Saves all your binds to a text file. The X value is the name of the file to use. |
| camdist <x></x> | X is the distance from the ship to the camera |
| CamReset | Reset the camera position to default |
| camturntoface <x></x> | Possible values for X is 0 or 1. When set to 1 the ship will attempt to turn when the camera is looking. This does not work with camUseAutoTargetLock. |
| camUseAutoTargetLock <x></x> | Possible values for X is 0 and 1. If turned on the Camera will stay locked on the target. |
| camUseChaseCam <x></x> | Possible values for X is 0 and 1. If it is turned on the camera will stay behind the ship. |
| Clear | Clear your chat |
| CombatLog <x></x> | Possible values are 0 or 1. If set to 1 then the combatlog will start recording. If set to 0 then no combat log recording will occur. |
| ControlSchemeCycle | Ground: Toggle Shooter mode. |
| emote <x></x> | Execute an emote with local text. The X value is the name of the emote |
| emote_notext <x></x> | Execute an emote with no local text. The X value is the name of the emote |
| FireMines | Fire all mines |
| FirePhasers | Fire all beams and cannons |
| FirePhasersTorps | Fire all beams, cannons and torpedos |
| FireProjectiles | Fire all torpedos and mines |
| FireTorps | Fire all torpedos |
| focustargetclear | Clear the focus target |
| focustargetselect | Target the focus target |
| focustargetset | Set the Focus target to pin. |
| Follow | Ground: Follow your friendly target |
| frameRateStabilizer <x></x> | Possible values for X is 0 or 1. If it is 1 then the client attempts to stabilize how much the framerate changes. |
| gamma <x></x> | The X value indicates the gamma adjustment. The normal value is 1.0 but when the client is launched for the first time you adjust this value through the tutorial. |
| GenSendMessage HUD_Root | FireAll Fire all weapons |
| GenSendMessage Inventory_Root SwitchActiveWeapon | Ground: Switch to alternate weapon |
| GenSendMessage Throttle_FullImpulse_Button FullThrottle | Full Impulse toggle |
| GenSetEarlyOverrideFloat Hud_Buffs scale <x></x> | Set the size of your tray icons to a factor of X. The default value is 1.0. At 2.0 the icons will be double their size. |
| GenSetEarlyOverrideFloat Hud_Spacetraywindow_Large scale <x></x> | Set the size of your tray icons to a factor of X. The default value is 1.0. At 2.0 the icons will be double their size. |
| GenSetEarlyOverrideFloat Hud_Spacetraywindow_Secondary <x></x> | Set the size of your vertical tray icons to a factor of X. The default value is 1.0. At 2.0 the icons will be double their size. |
| GenSetEarlyOverrideFloat Hud_Statusself_Bufflist scale <x></x> | Set the size of your own buffs to a factor of X. The default value is 1.0. At 2.0 the icons will be double their size. |
| GenSetEarlyOverrideFloat Hud_Statustarget_Ground_Bufflist scale <x></x> | Set the size of the ground buff icons on your target to a factor of X. The default value is 1.0. At 2.0 the icons will be double their size. |
| GenSetEarlyOverrideFloat Hud_Statustarget_Space_Bufflist scale <x></x> | Set the size of the space buff icons on your target to a factor of X. The default value is 1.0. At 2.0 the icons will be double their size. |
| GenSetEarlyOverrideFloat Hud_Statustargetfocused_Ground_Bufflist scale <x></x> | Set the size of the ground buff icons on your focus target to a factor of X. The default value is 1.0. At 2.0 the icons will be double their size. |
| GenSetEarlyOverrideFloat Hud_Statustargetfocused_Space_Bufflist scale <x></x> | Set the size of the space buff icons on your focus target to a factor of X. The default value is 1.0. At 2.0 the icons will be double their size. |
| GenSetEarlyOverrideFloat Hud_Statustargetoftarget_Ground_Bufflist scale <x></x> | Set the size of the ground buff icons on your target's target to a factor of X. The default value is 1.0. At 2.0 the icons will be double their size. |
| GenSetEarlyOverrideFloat Hud_Statustargetoftarget_Space_Bufflist scale <x></x> | Set the size of the space buff icons on your target's target to a factor of X. The default value is 1.0. At 2.0 the icons will be double their size. |
| HolsterToggle | Ground: Toggle your gun to holster |
| InteractWindow | Execute Interaction. This is the default execution to start a terminal or NPC interaction. |
| Inventory | Open the character inventory. |
| local <x></x> | Say something in local chat (local X) |
| Map | Open the map. |
| maxfps <x></x> | The X value will indicate the maximum frame rate value that is allowed. |
| netgraph <x></x> | Possible values for X is 0 or 1. If it is 1 then the Ping times are displayed with a graph. |
| netTimingGraph <x></x> | Possible values for X is 0 or 1. If it is 1 then the graph is shown when netgraph is turned on. |
| perFrameSleep <x></x> | The X value will perform a client thread sleep routine after each frame is drawn for the milliseconds specified by X. |
| PvEQueues | Open the PVE Queue missions |
| PvPQueues | Open the PVP Queues |
| rdrMaxFramesAhead <x></x> | The client will attempt to render X number of frames ahead but might not use the Graphical unit. |
| rdrMaxGPUFramesAhead <x></x> | The client will attempt to render X number of frames ahead through the Graphical unit |
| ShowFPS <x></x> | Possible values for X is 0 or 1. If it is 1 the Frames per second will be displayed. |
| showmem <x></x> | Possible values for X is 0 or 1. If it is 1 then the memory used is displayed. |
| StatsPreset_Load Preset_1 | Set to Attack Power setting |
| StatsPreset_Load Preset_2 | Set to Defense Power setting |
| StatsPreset_Load Preset_3 | Set to Speed Power setting |
| StatsPreset_Load Preset_4 | Set to Balanced Power setting |
| Target <x></x> | Target the item or person with the name X |
| target_clear | Clear your target |
| Target_Enemy_Near | Target nearest enemy (based on settings) |
| Target_Enemy_Next | Target the next enemy (based on settings) |
| Target_Enemy_Next_Exposed | Target the next exposed enemy |
| Target_Friend_Next | Target the next friend |
| Target_Teammate <x></x> | Target the teammate in position X |
| team <x></x> | Say something to the team (team X) |
| tell <x>, <y></y></x> | Send a tell of Y to person X. Ei. /tell @tester, Hi |
| throttleadjust <x></x> | Add value to your throttle position. If X is 1.0 then it will add a 100 percent throttle but will stop at zero if it was in reverse. If X is -1.0 then the trottle will be adjusted a 100% back. If you were moving forward the throttle will stop at zero. |
| zone <x></x> | Say something in zone chat (zone X) |
Chat Window Key Bind Examples
/bind End "camUseChaseCam 1$$ camdist 200"
This example is great for space escorts. When you press the End button on the keyboard you will now be placed directly behind yourself at a the distance specified by camdist command. This command is a compound command. We used the double dollar sign delimiter to seperate two commands.
/bind 1 "target_teammate 1"
This command will target the teammate in position one of the team when you press the number one key above the qwerty keys.
/bind ` "target_Clear"
This command will clear your selected target to nothing when you press the tilde key.
Text File Key Bind Examples of the Above Commands
End "camUseChaseCam 1$$ camdist 200"
1 "target_teammate 1"
` "target_Clear"
Simplifying Key Binds by adding some complexity first
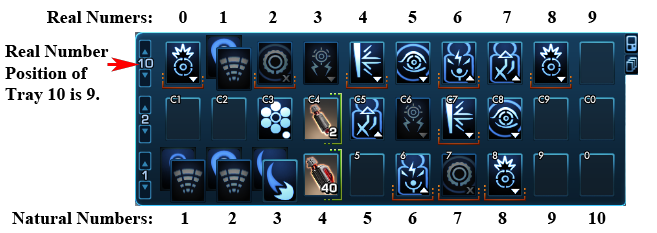
It can be a full time effort to create key binds to accomplish different complicated actions in the game. Deciding to make one change could require editing a complicated command to add one feature. There is a feature in the game that simplifies all of this. The game has 10 trays that can be used. Usually we make only three of them visible. Those other 7 remaining trays can be used in key binds. If we assign one key to a complete tray and then place our actions in those slots, we could now have a key that activates several actions. If we wanted to make changes all we have to do is go to that tray and alter the actions in the tray. No need to touch the key bind again.

The image shows where you can change the tray positions to access the other tray numbers.
Now to assign a key to tray 10 we will use a chain of commands. One thing to note is that in the chat window there is a maximum length that can be used. This limitation prevents us from assigning all the slots in a tray to one key. The maximum number of slots that can be assigned using the chat window is 8. To assign more you will need to use the text file method. The text file method will be elaborated on more later. If we wanted to assign tray 10 to the Numerical Key pad Zero button the following commands could be used:
Chat Window Command for 8 Slots of Tray 10
/bind numpad0 "+TrayExecByTray 9 0$$ +TrayExecByTray 9 1$$ +TrayExecByTray 9 2$$ +TrayExecByTray 9 3$$ +TrayExecByTray 9 4$$ +TrayExecByTray 9 5$$ +TrayExecByTray 9 6$$ +TrayExecByTray 9 7"
Text File Method for 10 Slots of Tray 10
numpad0 "+TrayExecByTray 9 0 $$ +TrayExecByTray 9 1 $$ +TrayExecByTray 9 2 $$ +TrayExecByTray 9 3 $$ +TrayExecByTray 9 4 $$ +TrayExecByTray 9 5 $$ +TrayExecByTray 9 6 $$ +TrayExecByTray 9 7 $$ +TrayExecByTray 9 8 $$ +TrayExecByTray 9 9"
Take note that we used the number 9 to reference tray 10. The easiest way to think of this is to just subtract one from the tray number and slot number.
Using the Text File to import Key Binds
What you will need is a text editor such as notepad. First let us look at the two commands that allow us to export and import key bind sets.
/bind_save_file <filename>
This command can be used to export your current key binds. The <filename> tag should be replaced with a name you can easily use and that has no spaces in it. You should also add a ".txt" at the end of the name so that you can locate and edit this file with notepad. An example of a filename would be spacekeys.txt . </filename></filename>
/bind_load_file <filename>
This command is used to import the key binds listed in the text file. The <filename> tag should be replaced with the name of the file. Make sure the file you are using has no spaces in the name. </filename></filename>
Steps:
In the chat window enter the follow command and hit enter: /bind_save_file mykeys.txt
Open Notepad and click on File Open.
Browse to the Star Trek Online game folder. This location can be different depending on the method you used to install Star Trek Online. It could be located under the Program Files folder or under the Steam folder. What you are looking for is a Folder that is named "Star Trek Online" and it will have a sub folder with the name "Live". Your mykeys.txt file will be located under the "Live" folder. One possible method to locate the game folder is to right click on the Star Trek Online Game icon and selecting Properties. The Start in property will indicate where the Game might be located. The folder will contain the GameClient.exe file.
Open the mykeys.txt file.
You should see some existing key binds. Some are created by the game and others will be ones you have changed manually in the Key Binds screen in game.
Enter your new commands on a new empty line.
Save your text file.
in the game's chat window enter the following command and hit enter: /bind_load_file mykeys.txt
Execution Order
When you create key binds with compounded commands you might want to be aware of the order in which the commands will execute. There are two phases to a key bind execution. The first Phase occurs when you press the key for the first time. The second phase is entered when you press the key a second time or repeatedly while an activity on the list is still activating. If you stop pressing the key and all the actions in the command list are no longer activating then Phase one is entered again.
Phase 1
In Phase one the first available action from left to right is picked and activated.
Phase 2
The First available skill from right to left is picked and activated. The priority therefore is increased from Left to Right.
Let us examine how the following key bind would work:
numpad0 "+TrayExecByTray 9 0 $$ +TrayExecByTray 9 1 $$ +TrayExecByTray 9 2 $$ +TrayExecByTray 9 3 $$ +TrayExecByTray 9 4 $$ +TrayExecByTray 9 5 $$ +TrayExecByTray 9 6 $$ +TrayExecByTray 9 7 $$ +TrayExecByTray 9 8 $$ +TrayExecByTray 9 9"
The resulting execution of Tray 10 is depicted in the image below:

If we press the key repeatedly, say twice a second, then we will enter Phase one and it will be followed by Phase two. Since there are two Battle Strategies on each end: In Phase one the first will be executed. In phase two it will already have been executed and will not be available as it is in a cooldown. The Tactical Initiative will therefore be activated second. From that point onwards, everything gains a priority from right to left. If we keep pressing the key then the priority remains right to left.
One way of fixing this in the key bind itself is to add two commands for the same slot. Let us look at the follow key bind:
numpad0 "+TrayExecByTray 9 9$$ +TrayExecByTray 9 0 $$ +TrayExecByTray 9 1 $$ +TrayExecByTray 9 2 $$ +TrayExecByTray 9 3 $$ +TrayExecByTray 9 4 $$ +TrayExecByTray 9 5$$ +TrayExecByTray 9 6$$ +TrayExecByTray 9 7$$ +TrayExecByTray 9 8$$ +TrayExecByTray 9 9"
By adding the same slot twice we can place an action in Slot 10 on Tray 10 to be the first action executed. If it is important to maintain the sequence then the action that goes into this slot should be readily available, before starting the pressed sequence. This will assist the transition from Phase 1 to Phase 2. We can also expand on this key bind further and always ensure a right to left execution.
numpad0 "+TrayExecByTray 9 9$$ +TrayExecByTray 9 8$$ +TrayExecByTray 9 7$$ +TrayExecByTray 9 6$$ +TrayExecByTray 9 5 $$ +TrayExecByTray 9 4$$ +TrayExecByTray 9 3$$ +TrayExecByTray 9 2$$ +TrayExecByTray 9 1 $$ +TrayExecByTray 9 0 $$ +TrayExecByTray 9 1 $$ +TrayExecByTray 9 2 $$ +TrayExecByTray 9 3 $$ +TrayExecByTray 9 4 $$ +TrayExecByTray 9 5$$ +TrayExecByTray 9 6$$ +TrayExecByTray 9 7$$ +TrayExecByTray 9 8$$ +TrayExecByTray 9 9"
With this command we have a mirror of all the Slots on tray 10. If we are in Phase one we will be executing the commands in Red and Purple from left to right. If we are in Phase Two we will be executing the commands in Blue and Purple from right to left.
Let us examine a situation where we might consider super buffing and wanting to launch our Torpedo as soon as the buff is complete. We would place our sequence of buffs on Tray 10 in reverse order and excluding the launch of the Torpedo. The key bind command would look as follows:
numpad0 "+TrayExecByTray 9 9$$ +TrayExecByTray 9 8$$ +TrayExecByTray 9 7$$ +TrayExecByTray 9 6$$ +TrayExecByTray 9 5$$ +TrayExecByTray 9 4$$ +TrayExecByTray 9 3$$ +TrayExecByTray 9 2$$ +TrayExecByTray 9 1$$ +TrayExecByTray 9 0$$FireTorps $$+TrayExecByTray 9 0 $$ +TrayExecByTray 9 1 $$ +TrayExecByTray 9 2 $$ +TrayExecByTray 9 3 $$ +TrayExecByTray 9 4 $$ +TrayExecByTray 9 5$$ +TrayExecByTray 9 6$$ +TrayExecByTray 9 7$$ +TrayExecByTray 9 8$$ +TrayExecByTray 9 9"
Now the mirror of commands exists around the FireTorps command in the center. This will ensure our buffs will execute from Right to Left on Tray 10 and then fire the Torpedo, when no other actions are available on the Tray.
The image below demonstrates the mirror effect with a keybind:

For Space Pilots
This command reassigns the space bar to fire cannons and beams as well as all of tray 10. Leaving tray 10 empty will still allow firing of cannons and beams. You will need to use the text file method to make this work.
Space "+TrayExecByTray 9 9$$ +TrayExecByTray 9 8$$ +TrayExecByTray 9 7$$ +TrayExecByTray 9 6$$ +TrayExecByTray 9 5$$ +TrayExecByTray 9 4$$ +TrayExecByTray 9 3$$ +TrayExecByTray 9 2$$ +TrayExecByTray 9 1$$ +TrayExecByTray 9 0$$FirePhasers $$+TrayExecByTray 9 0 $$ +TrayExecByTray 9 1 $$ +TrayExecByTray 9 2 $$ +TrayExecByTray 9 3 $$ +TrayExecByTray 9 4 $$ +TrayExecByTray 9 5$$ +TrayExecByTray 9 6$$ +TrayExecByTray 9 7$$ +TrayExecByTray 9 8$$ +TrayExecByTray 9 9"
Using the text file example below you can assign a key to seven trays and create conditional keys that include ship maintenance or a super buff for a tactical officer on the ground. Or even continuous healing for a Science officer.
The Text File method, by far out performs the chat window method, due to the fact that we can solve the Phase one and Phase two issues by mirroring the commands around a central command.
Dangers of Button Smashing
There are some problems with smashing buttons too fast. Once an ability is ending its activation, while you are smashing buttons, the item waiting in the queue to be activated next is not yet determined. Smashing buttons will constantly reset the progression through the sequence of slots. The animation below demonstrate the possible issue that might arise:
Ideally you want to press your key no faster than the lowest activation time. If you have an ability on your tray that has no activation time, then ignore it. Find the ability with the lowest activation time and use that as a reference. If your lowest activation time is 0.5 seconds then you will want to press your key about twice a second. If it is 0.25 seconds then you will want to press your key about 4 times a second. Even at 4 times a second you could be over doing it. If your ping time is higher than the rate at which you are pressing buttons then reduce how often you are pressing buttons. For example: if your ping is 300ms (0.3 sec) and your lowest activation time is 150ms (0.15 sec) then use the 0.3 sec as your reference. Which in this example will be 3 times a second.
Text File Example
Left "+TrayExecByTray 9 9$$ +TrayExecByTray 9 8$$ +TrayExecByTray 9 7$$ +TrayExecByTray 9 6$$ +TrayExecByTray 9 5$$ +TrayExecByTray 9 4$$ +TrayExecByTray 9 3$$ +TrayExecByTray 9 2$$ +TrayExecByTray 9 1$$ +TrayExecByTray 9 0$$+TrayExecByTray 9 0 $$ +TrayExecByTray 9 1 $$ +TrayExecByTray 9 2 $$ +TrayExecByTray 9 3 $$ +TrayExecByTray 9 4 $$ +TrayExecByTray 9 5$$ +TrayExecByTray 9 6$$ +TrayExecByTray 9 7$$ +TrayExecByTray 9 8$$ +TrayExecByTray 9 9"
Down "+TrayExecByTray 8 9$$ +TrayExecByTray 8 8$$ +TrayExecByTray 8 7$$ +TrayExecByTray 8 6$$ +TrayExecByTray 8 5$$ +TrayExecByTray 8 4$$ +TrayExecByTray 8 3$$ +TrayExecByTray 8 2$$ +TrayExecByTray 8 1$$ +TrayExecByTray 8 0$$+TrayExecByTray 8 0 $$ +TrayExecByTray 8 1 $$ +TrayExecByTray 8 2$$ +TrayExecByTray 8 3 $$ +TrayExecByTray 8 4 $$ +TrayExecByTray 8 5$$ +TrayExecByTray 8 6$$ +TrayExecByTray 8 7$$ +TrayExecByTray 8 8$$ +TrayExecByTray 8 9"
Right "+TrayExecByTray 7 9$$ +TrayExecByTray 7 8$$ +TrayExecByTray 7 7$$ +TrayExecByTray 7 6$$ +TrayExecByTray 7 5$$ +TrayExecByTray 7 4$$ +TrayExecByTray 7 3$$ +TrayExecByTray 7 2$$ +TrayExecByTray 7 1$$ +TrayExecByTray 7 0$$+TrayExecByTray 7 0 $$ +TrayExecByTray 7 1 $$ +TrayExecByTray 7 2 $$ +TrayExecByTray 7 3 $$ +TrayExecByTray 7 4 $$ +TrayExecByTray 7 5$$ +TrayExecByTray 7 6$$ +TrayExecByTray 7 7$$ +TrayExecByTray 7 8$$ +TrayExecByTray 7 9"
Up "+TrayExecByTray 6 9$$ +TrayExecByTray 6 8$$ +TrayExecByTray 6 7$$ +TrayExecByTray 6 6$$ +TrayExecByTray 6 5$$ +TrayExecByTray 6 4$$ +TrayExecByTray 6 3$$ +TrayExecByTray 6 2$$ +TrayExecByTray 6 1$$ +TrayExecByTray 6 0$$+TrayExecByTray 6 0 $$ +TrayExecByTray 6 1 $$ +TrayExecByTray 6 2 $$ +TrayExecByTray 6 3 $$ +TrayExecByTray 6 4 $$ +TrayExecByTray 6 5$$ +TrayExecByTray 6 6$$ +TrayExecByTray 6 7$$ +TrayExecByTray 6 8$$ +TrayExecByTray 6 9"
Add "+TrayExecByTray 5 9$$ +TrayExecByTray 5 8$$ +TrayExecByTray 5 7$$ +TrayExecByTray 5 6$$ +TrayExecByTray 5 5$$ +TrayExecByTray 5 4$$ +TrayExecByTray 5 3$$ +TrayExecByTray 5 2$$ +TrayExecByTray 5 1$$ +TrayExecByTray 5 0$$+TrayExecByTray 5 0 $$ +TrayExecByTray 5 1 $$ +TrayExecByTray 5 2 $$ +TrayExecByTray 5 3 $$ +TrayExecByTray 5 4 $$ +TrayExecByTray 5 5$$ +TrayExecByTray 5 6$$ +TrayExecByTray 5 7$$ +TrayExecByTray 5 8$$ +TrayExecByTray 5 9"
Divide "+TrayExecByTray 4 9$$ +TrayExecByTray 4 8$$ +TrayExecByTray 4 7$$ +TrayExecByTray 4 6$$ +TrayExecByTray 4 5$$ +TrayExecByTray 4 4$$ +TrayExecByTray 4 3$$ +TrayExecByTray 4 2$$ +TrayExecByTray 4 1$$ +TrayExecByTray 4 0$$+TrayExecByTray 4 0 $$ +TrayExecByTray 4 1 $$ +TrayExecByTray 4 2 $$ +TrayExecByTray 4 3 $$ +TrayExecByTray 4 4 $$ +TrayExecByTray 4 5$$ +TrayExecByTray 4 6$$ +TrayExecByTray 4 7$$ +TrayExecByTray 4 8$$ +TrayExecByTray 4 9"
numpad0 "+TrayExecByTray 3 9$$ +TrayExecByTray 3 8$$ +TrayExecByTray 3 7$$ +TrayExecByTray 3 6$$ +TrayExecByTray 3 5$$ +TrayExecByTray 3 4$$ +TrayExecByTray 3 3$$ +TrayExecByTray 3 2$$ +TrayExecByTray 3 1$$ +TrayExecByTray 3 0$$+TrayExecByTray 3 0 $$ +TrayExecByTray 3 1 $$ +TrayExecByTray 3 2 $$ +TrayExecByTray 3 3 $$ +TrayExecByTray 3 4 $$ +TrayExecByTray 3 5$$ +TrayExecByTray 3 6$$ +TrayExecByTray 3 7$$ +TrayExecByTray 3 8$$ +TrayExecByTray 3 9"
Other Resources
